Open an Outlook Shared Mailbox
Access a shared mailbox in Windows desktop application
Adding a Shared Mailbox in Outlook (Microsoft Office 365 for Windows)
Below, we will show you how to add a Shared Mailbox to Outlook in Microsoft Office 365 for Windows
(Steps: 4, Time Estimate: 3 Minutes)
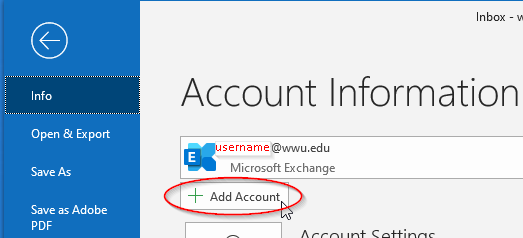
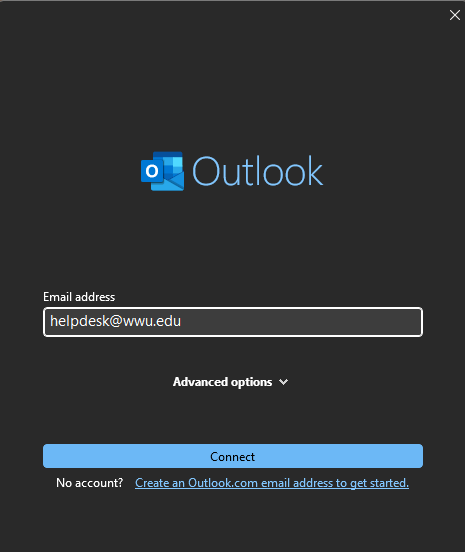
1. Open Outlook and click the File menu in the upper left, then click the +Add Account button below
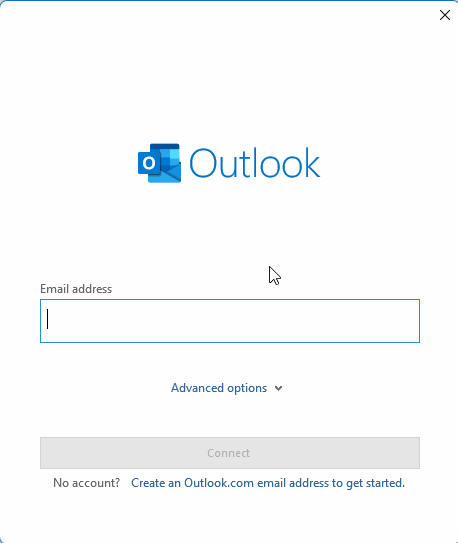
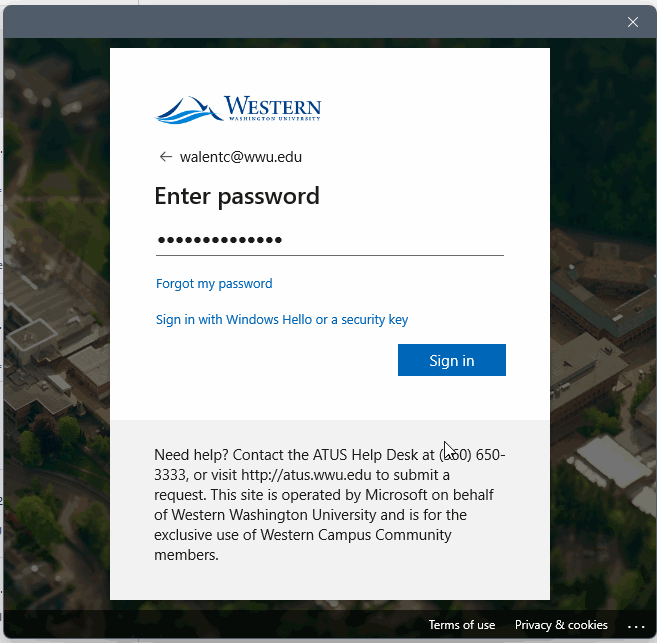
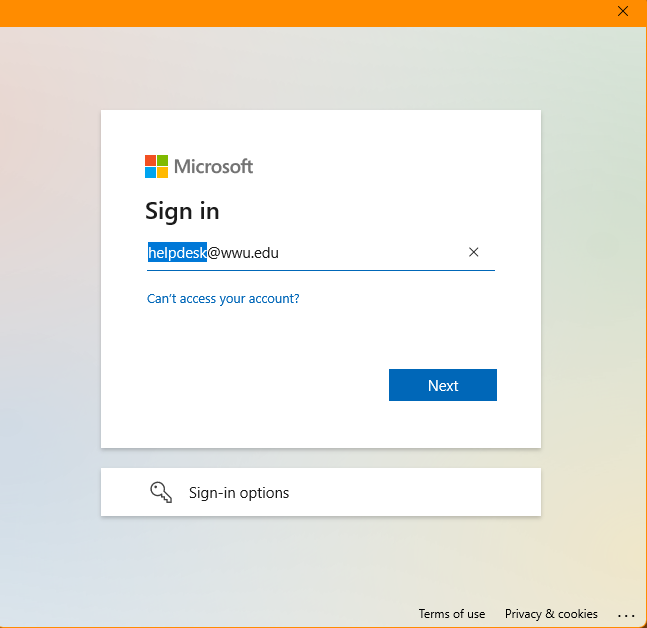
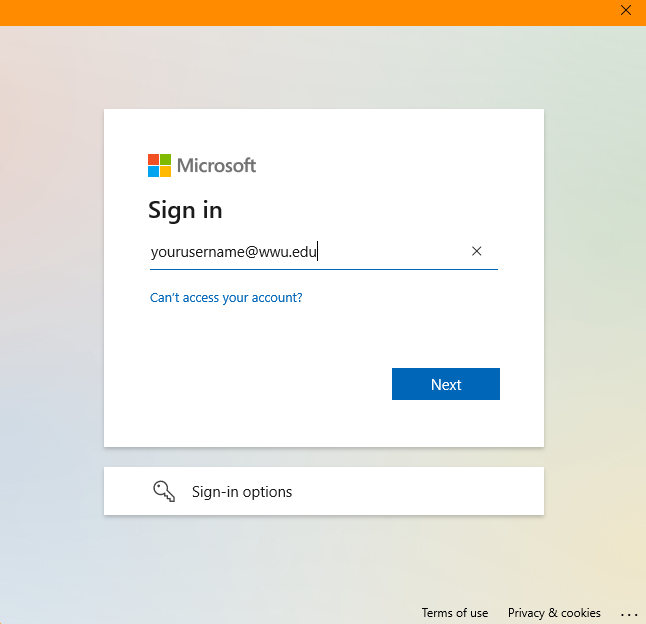
2. Type the name of the Shared Mailbox you'd like to open and click Connect. Click the Sign in with another account link that appears in the Sign in verification window, erase the name of the mailbox that appears in the Sign in verification window, enter your own Universal username@wwu.edu and then click Next like so:
3. Enter your universal password and approve any Authentication Verification and Terms of Use Agreement request, if prompted:
4. Click Done, then close and restart Outlook to see your new Shared mail resource in the lowest left portion of the inbox pane.

There is a new version of Outlook that you can toggle off/on in the upper righthand corner of the desktop application. This is akin to the experience of Outlook on the web.
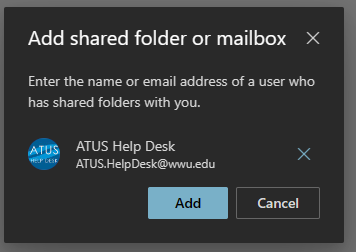
1. Open Outlook, right click on your email address in the lefthand pane, and select Add shared folder or mailbox.
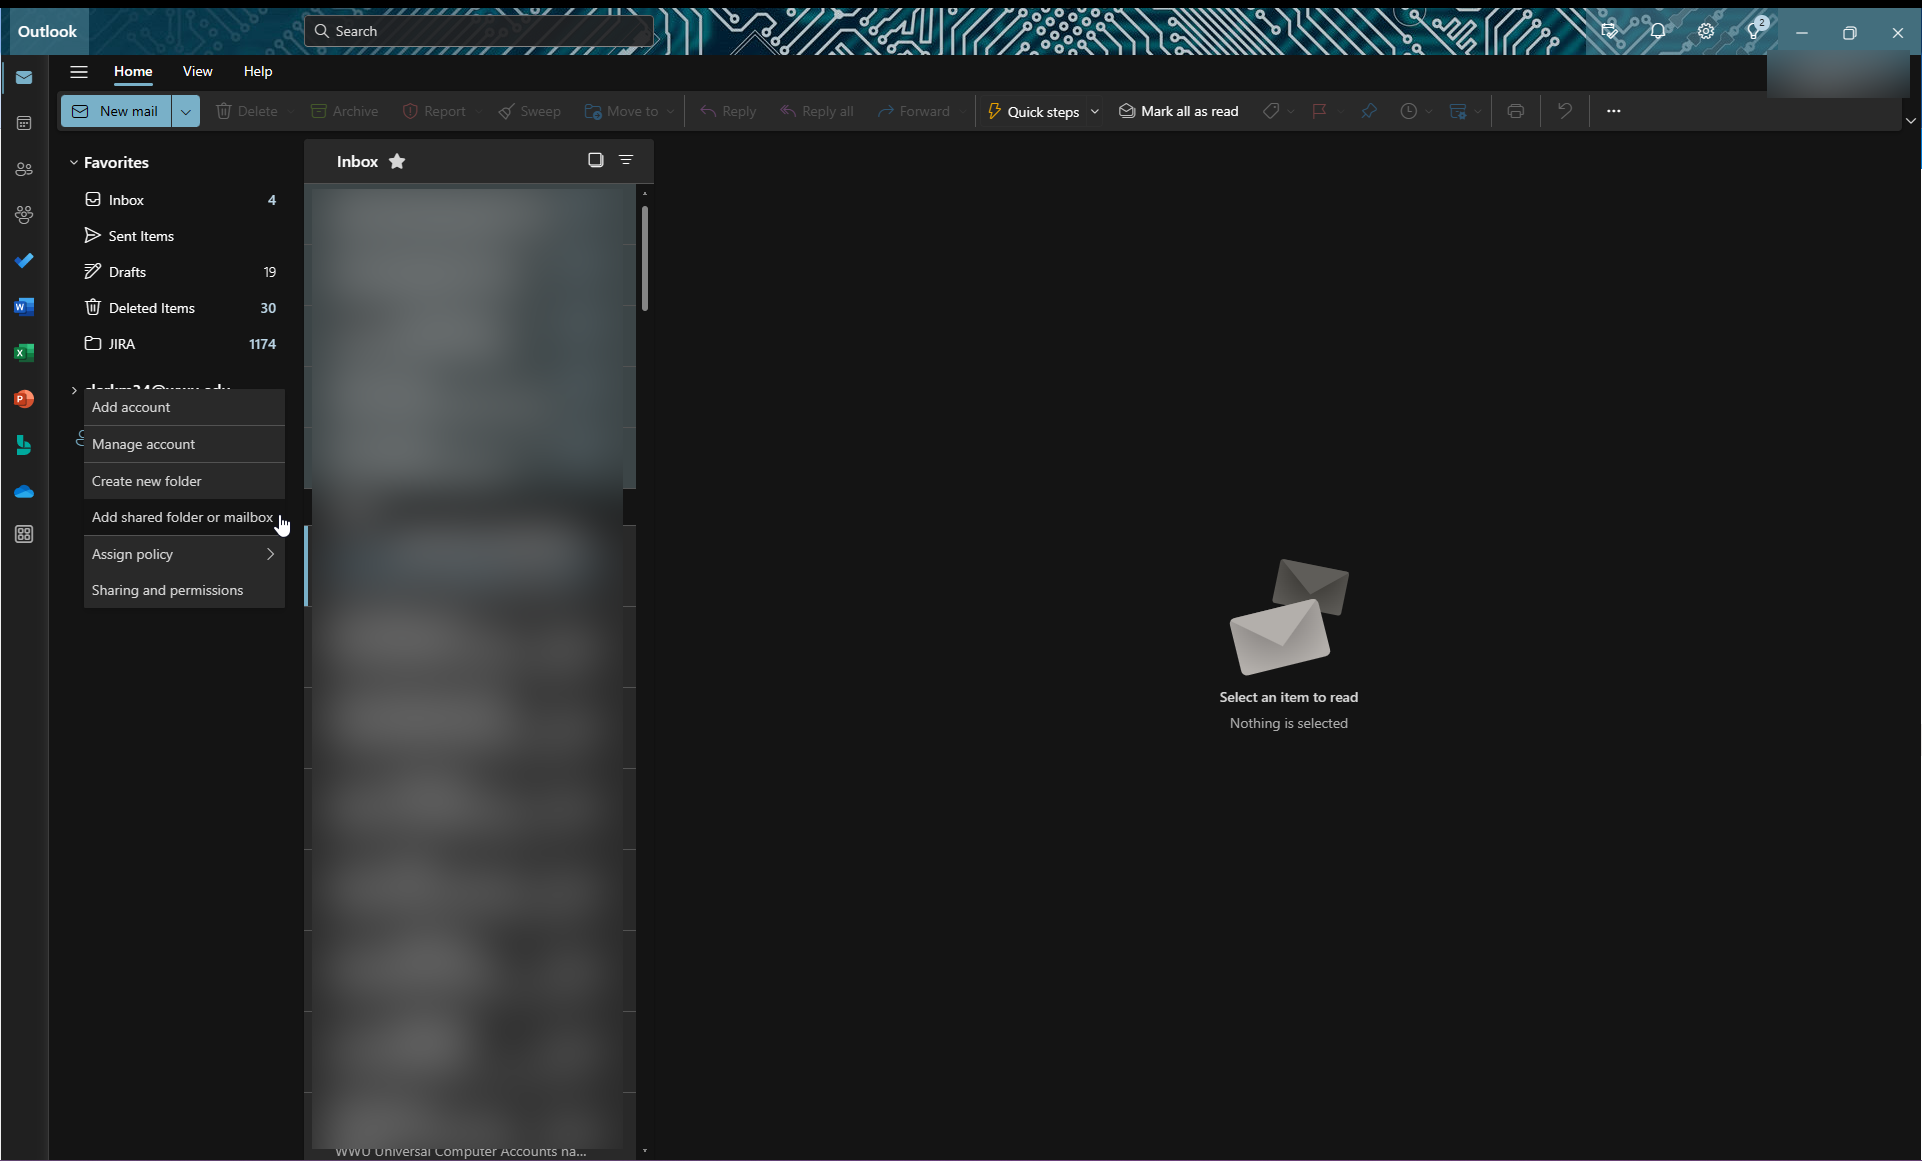
2. Enter the name of the mailbox you wish to add and click Add.
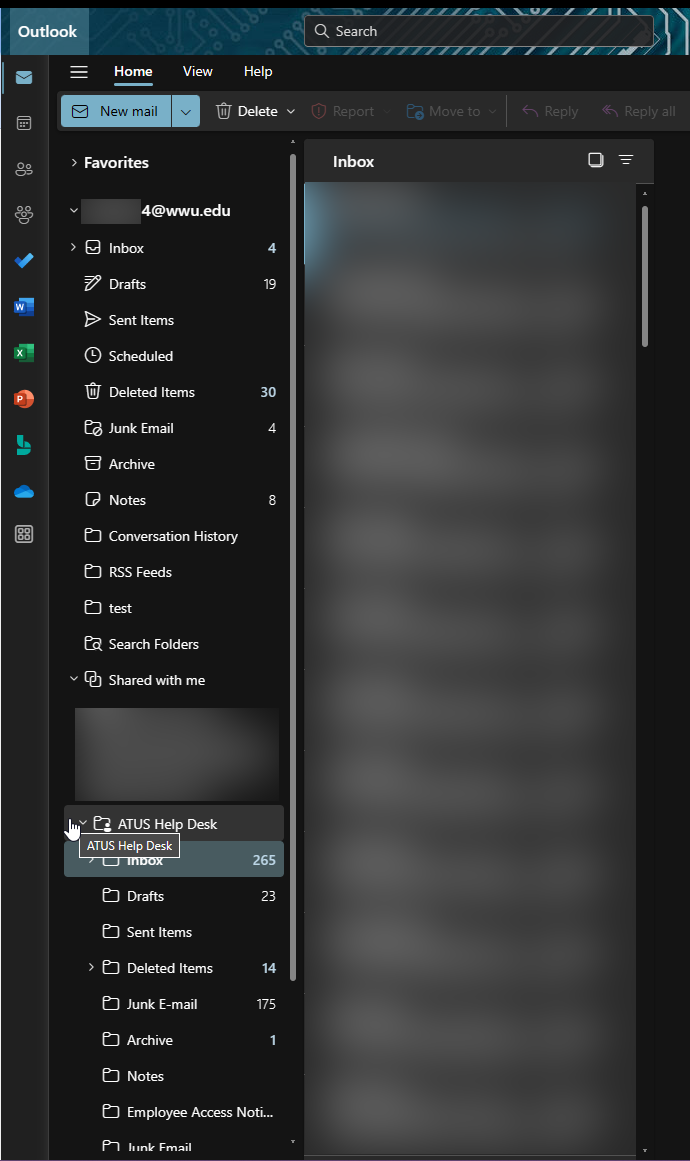
3. The mailbox will now be available under Shared with me.
Access a shared mailbox in Mac desktop application
- Go to Tools on the menu bar and select Accounts…
- Click the ‘+’ in the lower left corner and select New Account… to add a new account.
- Add your group mailbox email address and click Continue
- Click Sign in with another account and then enter your universal cloud username (in the form of username@wwu.edu) and password.
- Click Done
- You can change the Account description to the mailbox name. Close out of this window; the group mailbox will now be listed!
- Click Microsoft Outlook in the upper left and click Preferences
- Select Accounts and then click Delegation and Sharing underneath your account details
- Click the Shared With Me tab to the right, and then click the plus + button to add the Shared Mailbox you've been granted access to by searching for it in the provided window. Click the mailbox name to add it, and then click Done.
- The Shared Mailbox will appear below your account on the left-hand pane, in addition to it's Calendar in the Calendar area.
Access a shared mailbox using a Web browser
- Login to OWA as yourself.
- Select your name in the upper right corner
- Click the link to Open another mailbox...
- Search for the mailbox you wish to open
- Click Open when the mailbox is found.
This follows effectively the same process as adding an account in the new Outlook for Windows; see that dropdown for screenshots.
- Right click on Folders and select Add shared folder or mailbox.
- Enter the shared mailbox address. Click on it when it appears in the dropdown, then click Add.
- It will now appear in the lefhand panel under your other folders.
Mobile Devices
The Outlook app for iOS and Android allows you to add a shared mailbox from the settings.
If you are not able to access a shared mailbox in the Outlook client:
First try to open the mailbox using a Web browser as described above. If you can access the mailbox using a Web browser, try removing the mailbox and re-adding it to Outlook. If it was recently created, there may be a delay between when the inbox is created and when it's in a fully usable state. If you're not sure if you have permissions to a shared mailbox, simply contact the ATUS Help Desk to verify that you have access to that mailbox. If you do not, you will need supervisor's approval to be added. Contact the Help Desk with any other difficulties adding or accessing a shared mailbox.
Need to set up Mail Merge from a shared mailbox?
In order to send a mail merge from a shared mailbox, you must add it as a second profile onto the Outlook Desktop client. As of March 2024, you can no longer add a shared mailbox profile via the Control Panel. The steps below explain how to set up a new profile with a shared mailbox through the Outlook desktop application.
- Launch the Outlook desktop application and select File.
- Under the Info tab, select Account Settings > Change Profile.

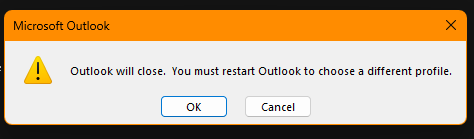
- Outlook will present a popup saying that Outlook needs to close and be restarted. Select OK.
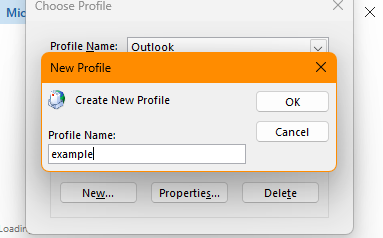
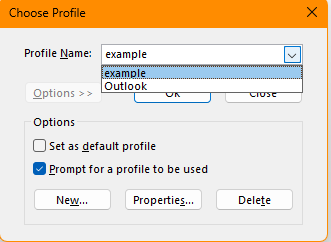
- Relaunch Outlook. You should now get a popup asking you to choose a profile. Select the Options >> button, and then select New...

- Name the profile whatever you would like it to be called. This does not need to be the full email address. Click OK.
- Now you will enter the email address of the shared mailbox, including the @wwu.edu.
- When the Microsoft sign-in window pops up, delete the shared mailbox email and enter your own username@wwu.edu. Select Next.
- The Microsoft sign in with the WWU logo will then load, where you will enter your Universal Account Password and select Sign in. This will load for a moment then tell you that the account has been successfully added. Select Done.

- The new profile will then appear in the dropdown list in the Choose Profile window. Select it, then select OK. Make sure that the box under Options reading "Prompt for a profile to be used" is selected.
It will take a few minutes to load the first time, but Outlook will eventually launch the new profile and begin to populate the shared mailbox's emails. From there, you can follow the steps you normally take in order to do a mail merge, but select the new profile rather than your own.
Need More Help?
- Submit a request form
- (360) 650-3333
- helpdesk@wwu.edu
- Swing by our office in Haggard Hall 123!
Telephone & Email Support Hours:
Fall, Winter and Spring quarter:
- Monday - Thursday: 8am to 5pm. Limited phone support 6pm to 8pm.
- Fridays: 8am to 5pm
- Weekends: Limited phone support 1pm to 3pm.
Summer Quarter:
- Monday - Friday: 8am to 5pm
- Weekends: We are not staffed on weekends during Summer quarter
Walk-in Support Hours:
- Monday - Friday: 8am to 5pm
- Closed after 5 and on weekends
The Help Desk is closed on holidays and when the university is closed due to inclement weather.
After hours:
For system or network outages outside of Help Desk hours, please call the non-emergency number for Western Police at (360) 650-3555.